How to Change Your HVAC Filter: A Step-by-Step Guide
Maintaining your HVAC system is essential for ensuring a comfortable and healthy indoor environment. One of the most critical and straightforward maintenance tasks you can perform is changing the HVAC filter.
Regularly replacing your HVAC filter can improve air quality, increase energy efficiency, and prolong the life of your system. In this step-by-step guide, we will walk you through the process of changing your HVAC filter.
Because changing your furnace filter is so important, we’ve created today’s guide to add to the process. Let’s jump in.

Step 1: Gather Your Supplies
Before you begin, make sure you have the following supplies:
– A new HVAC filter (ensure it’s the correct size and type for your system)
– A screwdriver (if your HVAC system requires it)
– A vacuum cleaner or a damp cloth to clean the filter area
Step 2: Turn Off the HVAC System
Safety first! Turn off your HVAC system before you start the replacement process. You can do this by setting your thermostat to the “off” position or turning off the circuit breaker that powers your HVAC unit.
Step 3: Locate the Filter
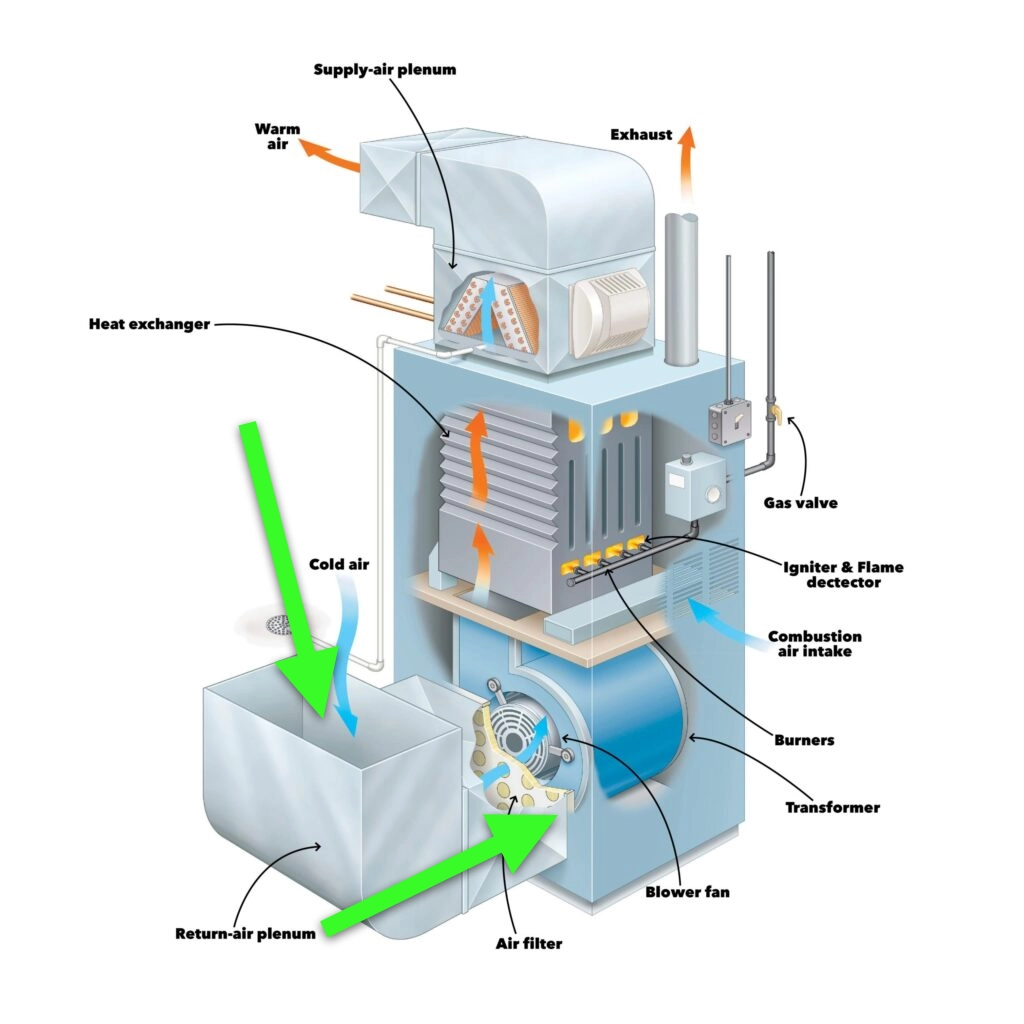
HVAC filters are usually located in one of three places:
1. The return air duct
2. The blower compartment
3. The air handler unit
Check your HVAC system’s manual if you are unsure where your filter is located.
Step 4: Remove the Old Filter
Once you’ve located the filter, carefully remove it from its housing. If the filter is behind a cover or a grille, you may need to use a screwdriver to open it. Pay attention to how the old filter is positioned so you can correctly insert the new one.
Step 5: Inspect the Old Filter
Take a moment to inspect the old filter. If it’s visibly dirty or clogged with dust and debris, it’s definitely time for a replacement. Regularly changing your filter can help prevent dust and allergens from circulating in your home.


Step 6: Clean the Filter Area
Before inserting the new filter, clean the filter area. Use a vacuum cleaner or a damp cloth to remove any dust and debris that may have accumulated. This will ensure that your new filter works efficiently.
Step 7: Insert the New Filter
Take your new filter and check for arrows or indicators that show the correct airflow direction. These arrows should point towards the blower or the air handler. Carefully insert the new filter into the housing, ensuring it fits snugly.

Step 8: Close the Cover
If you had to remove a cover or grille to access the filter, make sure to securely replace it. Use your screwdriver if necessary to fasten any screws.
Step 9: Turn On the HVAC System
Once the new filter is in place and everything is securely closed, turn your HVAC system back on. Set your thermostat to the desired temperature and ensure the system is running smoothly.
Step 10: Set a Reminder for the Next Filter Change
To keep your HVAC system running efficiently, set a reminder to check and change your filter regularly. Depending on the type of filter and your household conditions (pets, allergies, etc.), this could be every 1-3 months.
Personally, I schedule the reminders in my phone for my own home, there are several handy apps like Google Calendar and the iOS reminder app to make it convenient.
Conclusion
Changing your HVAC filter is a simple yet vital task that can significantly impact your home’s air quality and your HVAC system’s performance. By following these easy steps, you can ensure that your HVAC system runs efficiently and effectively, providing a comfortable and healthy environment for you and your family. Don’t forget to make this a regular part of your home maintenance routine!
Be sure to check out our other article on how to change a furnace filter for more information.
If you have any questions or need further assistance with your HVAC system, feel free to contact us. We’re here to help you maintain a comfortable and efficient home.
Did yoknow that Total Aire Care is the Trane authorized dealer in Kitchener-Waterloo? Check
